1: Tips Trick's: 2011

Sabtu, 17 September 2011

0 Cara Mengatasi Galat Blogger : bX-fa9wwp

Solusi/Solution Error Galat bX-fa9wwp On Blogger/Blogspot – Selama beberapa hari ini banyak yang  mengalami error galat bX-fa9wwp pada blogger / blogspot, sehingga kesulitan untuk membuat posting baru atau moderasi komentar. Menurut beberapa informasi yang saya dapatkan dari Google, masalah error galat bX-fa9wwp di blogger / blogspot ini terjadi karena blogger sedang melakukan beberapa update. Berikut ini cara mengatasi (solusi/solution) error galat bX-fa9wwp pada blogspot / blogger :
1.    Login ke http://draft.blogger.com/home dengan menggunakan username dan password blogger anda.
2.    Pada sudut kanan atas anda akan melihat pilihan bahasa, jika setting bahasa anda saat ini adalah bahasa Indonesia maka ganti setting bahasa ini ke bahasa Inggris.
3.    Jika sudah kembalikan lagi setting bahasa ini ke bahasa Indonesia seperti semula (bolak balik nih ceritanya !).
4.    Klik logout/sign out dari http://draft.blogger.com/home
5.    Jika proses diatas berhasil, anda sudah dapat login seperti biasa ke akun blogger anda di http://blogger.com/.
6.    Jika masih terjadi error galat bX-fa9wwp, lewati saja langkah no.3 diatas sehingga setting bahasa berada pada setting default yaitu bahasa Inggris. Setelah 2-3 hari baru anda rubah lagi setting bahasa ke bahasa Indonesia.

Jumat, 16 September 2011

0 Cara Membagi / partisi hardisk dengan EASEUS

Quote:
Quote:
sebelumnya rate thread ini dulu ya
Quote:
ane mau bagi pengalaman kepada agan-agan tentang membagi / partisi hardisk dengan menggunakan EASEUS Partition Manager..

Tadi ane nyoba partisi hardisk ane dengan EASEUS, soalnya hardisk ane cuma 1 partisi yaitu "C" .. ane mau jadiin 2 .. C buat system dan D buat data-data..
ternyata partisinya hanya memerlukan waktu 1 jam saja (buat kompi ane) termasuk check hardisk, dan defrag dengan tuneup. kalo kompi agan ane g tau berapa lama?
Quote:
Langsung aja ane berikan langkah2 membagi hardisk menjadi 2 bagian
download softwarenya dulu di websitenya


Code:
http://www.partition-tool.com/personal.htm
beberapa hal yang perlu diperhatikan sebelum membagi partisi :

1. tutup semua aplikasi, kalau perlu disable antivirus untuk sementara
2. jika perlu backup data penting ke dalam flashdisk
3. pastikan kondisi hardisk dalam keadaan baik, cara pengecekan hardisk. Klik kanan drive C: atau D: dll, pilih Properties > Tools > Error-checking > Check Now… Pilih 2 opsi yang tersedia dan Klik Start untuk melanjutkan
4. Defrag Hardisk , bisa menggunakan tool bawaan windows atau dengan software yg lainnya.. kalo ane pake tuneup utilities 2011
5. Hal yang paling penting, kalau anda menggunakan deep freeze untuk di uninstall dulu agar proses partisi tidak gagal dan agar tidak ada masalah

Cara membagi partisi hardisk dari 1-partisi menjadi 2-partisi :

Pada dasarnya prosesnya adalah mengurangi jumlah space yang terpakai oleh partisi-1 (yang memakai seluruh ruangan hardisk), sehingga akan muncul space hardisk kosong yang baru, untuk kemudian space hardisk yang tidak terpakai akan dibuat partisi baru.

1. Buka EASEUS Partition Manager lihat gambar-1, terlihat 1 partisi Hardisk yang aktif (warna kuning=space hardisk yang terisi data, warna abu-abu=space hardisk yang masih kosong) kemudian geser dengan mouse pada tanda panah, ke kiri untuk mengurangi ukuran partisi 1 menurut kebutuhan anda..
Spoiler for gambar:


2. pada gambar-2, sisakan sedikit space kosong pada partisi 1 yang akan dikurangi untuk kebutuhan data
Spoiler for gambar:


3. pada gambar-3, klick kanan pada Unallocated dan pilih Create
Spoiler for gambar:


4. akan muncul gambar-4, isi partition label sesuka anda, kemudian tekan Ok.
Spoiler for gambar:


5. cari tombol Apply gambar-5, tekan Apply
Spoiler for gambar:


6. akan muncul gambar-6, kemudian tekan Yes
Spoiler for gambar:


7. kemudian muncul tampilan gambar-7 (notifikasi komputer akan melakukan restart ketika melakukan proses) kemudian tekan Yes
Spoiler for gambar:


8. komputer akan melakukan proses pembagian partisi dan akan melakukan booting ulang, tunggu saja komputer ketika booting ulang, pada saat booting akan muncul gambar-8, tunggu sampe selesai dan masuk ke windows lagi
Spoiler for gambar:

9. setelah masuk windows lagi proses pembagian partisi menjadi 2 partisi telah selesai.
Quote:
UPDATE


Karena banyak yang request cara menggabungkan partisi hardisk, Kali ini ane akan share caranya

Cara menggabungkan partisi hardisk dari 2-partisi menjadi 1-partisi :

Prosesnya adalah menghapus partisi-2 untuk kemudian memperluas space partisi-1 hingga memenuhi semua ruang yang kosong pada bekas partisi-1

1. pada gambar-1, hapus partisi-2 klick kanan dan pilih delete (sebelumnya semua isi hardisk pada partisi-2 di pindah / dikosongkan dulu)
Spoiler for gambar:


2. gambar-2, konfirmasi delete partition tekan OK
Spoiler for gambar:


3. gambar-3, perbesar space partisi-1 tekan dan tahan klick kiri mouse kemudian geser kekanan penuh
Spoiler for gambar:


4. gambar-4, tampilan setelah isi partisi-1 digeser penuh kekanan
Spoiler for gambar:


5. tekan Apply
Spoiler for gambar:


6. konfirmasikan dengan tekan Yes
Spoiler for gambar:


7. gambar-7, proses penggabungan partisi dimulai
Spoiler for gambar:


8. kemudian restart komputer.

0 [info]cara ganti MAC address windows 7

nubi mau kasi info dikit,

permisi ya para juragan... beberapa operator hotspot kadang memblokir macaddress kita karena berbagai alasan (misal, download berlebih dan buka site porno,...)

supaya bisa tetep ngenet ya ganti aja mac address comp kita

buat ganti mac address wifi di windows 7:
1.buka: control panel-network and internet-network and sharing center

2.lalu:klik di sebelah kanan ada Connection:Wireless Network Connection (nama hotspot)

3.akan terbuka wireless network connection status

4.klik properties

5.klik configure

6.klik tab advance

7.pada klik network address dan isi value MAC yg di mau dsana (terserah misal:123456789o)

8.klik OK

9.matikan WIFI lalu hidupkan kembali, MAC address anda akan sudah berubah

mohon respon dari teman2

0 WIndows 8 developer preview

gan Windows 8 Developer preview udah muncul

http://msdn.microsoft.com/en-us/windows/home/


Quote:
Originally Posted by zigwi View Post
kalo mau langsung download gan

Windows Developer Preview with developer tools English, 64-bit (x64)

Sha 1 hash - 6FE9352FB59F6D0789AF35D1001BD4E4E81E42AF

All of the following come on a disk image file (.iso). See below for installation instructions.

64-bit Windows Developer Preview
Windows SDK for Metro style apps
Microsoft Visual Studio 11 Express for Windows Developer Preview
Microsoft Expression Blend 5 Developer Preview
28 Metro style apps including the BUILD Conference app


Windows Developer Preview English, 64-bit (x64)

Sha 1 hash – 79DBF235FD49F5C1C8F8C04E24BDE6E1D04DA1E9

Includes a disk image file (.iso) to install the Windows Developer Preview and Metro style apps on a 64-bit PC


Windows Developer Preview English, 32-bit (x86)

Sha 1 hash - 4E0698BBABE01ED27582C9FC16AD21C4422913CC

Includes a disk image file (.iso) to install the Windows Developer Preview and Metro style apps on a 32-bit PC
nya gan kalau berkenan

sorry belom bisa ngasih mirror, ane sendiri aja belom kelar donlot

0 Review Modem smartfren ec1261-2

Salam.... Agan2 Sekalian...

Newbie mau tanya tentang review modem smartfren ec1261-2 terbaru gan...


kabarnya sudah di unlock dan performanya jauh beda dengan modem ac682...

selisih harganya lumayan gan..
ac682 kisaran 199rb..
ec1261-2 kisaran 299rb..

Tolong bagi agan2 sekalian yang punya informasi tentang tuh modem bisa di review disini...

0 Yahoo! Messenger 11 FINAL telah dirilis

YAHOO! MESSENGER OFFLINE INSTALLER

1. Yahoo! Messenger 11.0.0.2009 FINAL


Quote:
Versi terbaru [FINAL] dari Yahoo Messenger 11 ini telah diperbaiki dari banyak bug dan ditingkatkan kestabilannya.

Berikut sekilas dari apa yang dapat Anda harapkan di Yahoo! Messenger 11:

Undang teman Anda untuk bermain game - Selain pesan instan, pesan teks, panggilan suara dan video, sekarang Anda dapat bermain game sosial populer seperti Mafia Wars dan Fishville di dalam Yahoo! Messenger.

Bersaing dengan teman-teman dimanapun mereka berada - Lihat, mengomentari dan update dari Yahoo! Pulse, Flickr, Facebook, Twitter, dan banyak lagi, semua dari dalam Yahoo! Messenger.

Posting satu status untuk beberapa jaringan sosial - Berbagi status Messenger secara bersamaan pada Yahoo! Pulse, Facebook, dan Twitter.

Chat dengan teman Facebook - Selain teman Anda di Windows Live, Anda sekarang dapat IM teman-teman Facebook. Lanjutkan percakapan Anda saat bepergian menggunakan Web Messenger Ponsel, SMS Messenger atau Yahoo Messenger untuk Android App.

Selalu tersedia - Tetap masuk ke PC secara bersamaan sehingga Anda tidak perlu kehilangan pesan.

Akses mudah ke percakapan terakhir - Ambil semua percakapan IM Anda dari PC manapun di mana Anda harus sign in ke Yahoo! Messenger.

Personalisasi pengalaman Anda dengan SKIN baru yang segar - Ekspresikan diri Anda dan menunjukkan kepribadian Anda dengan salah satu dari 7 kulit utusan baru ditambahkan.

2. Yahoo! Messenger 10.0.0.1270 FINAL


3. Yahoo! Messenger 9.0.0.2162 FINAL


4. Yahoo! Messenger 8.1.0.421 FINAL


5. Yahoo! Messenger for Vista 2008.06.30.1046 [Discontinued Project]

1 Cara Mendownload Game Online

Apabila anda suka memainkan game flash online dan anda mempunyai game flash online favorit yang ingin sekali anda mainkan di pc anda dalam keadaan offline alias tidak terhubung dengan internet.
Jika anda ingin memainkannya secara offline, maka terlebih dahulu anda harus mendownload game tersebut. Permasalahnnya, pada situs game online yang anda kunjungi tidak terdapat tombol download dan sejenisnya, padahal anda ingin sekali mendownloadnya. Nah! untuk itu saya mempunyai trik dan software yang sering saya gunakan untuk mendownload game flash online.
Untuk itu kita memerlukan bantuan dari software "FlashGet" yang dapat mendownload game flash online kesukaan kita agar dapat dimainkan di pc secara offline.
Mau? Langsung Saja...
Silahkan ikuti langkah-langkah berikut:
1.Download software FlashGet disini
2.Buka situs game online yang ingin sobat download gamenya.
Sebagai contohnya, saya ingin mendownload salah satu game di situs www.miniclip.com .
Lalu saya klik salah satu game yang ingin saya download, sebagai contohnya, saya ingin mendownload game "Final Ninja Zero".
3.Setelah halaman untuk game "Final Ninja Zero" terbuka, maka copy kan link addressnya.
4.Buka software FlashGet dan tekan tombol "F7" pada keyboard maka akan muncul jendela "FlashGet Site Explorer". Pastekan link address game tadi pada kolom "address" dan tekan enter.
Tunggu proses scaning hingga selesai.

5.Setelah proses scaning selesai, carilah pada kolom "type" yang berekstensi "swf".
Setelah dapat,klik kanan pada file swf tersebutdan pilih "download".
Tentukan tempat penyimpanannya dan klik ok.

Nah! bagi anda yang sudah mendownload gamenya dalam format swf dan ingin mengubahnya menjadi aplikasi (exe) dapat melihat caranya disini
NB : NGGAK SEMUA GAME ONLINE BISA DI DOWNLOAD

0 Cara Pasang Snap Shot Di Blogger

Tahukah apa itu Snap Shot? Bagi para pengguna blog ber-platform Wordpress tentu akan sering menemuinya, karena itu adalah salah satu fitur blog yang disediakan Wordpress.
Kembali ke pertanyaan tadi, Snap Shots adalah semacam screen shoot suatu Website ketika kursor mouse diarahka pada suatu link (kira-kira seperti itulah jawabannya). Blogger/blogspot memang tidak memiliki fasilitas ini, namun kita bisa membuatnya sendiri.
Untuk membuatnya, berikut langkah-langkahnya:
1. Loginlah ke Blogger
2. Buka URL berikut http://account.snap.com/signup.php
3. Pada bagian itu kita bisa melakukan pengaturan untuk snap shots, mulai dari tema (theme), logo, dan bahasa (language) yang akan digunakan. Jika anda tidak ingin mengaturnya klik Skip.
4. Lalu akan tampil account Info. Isilah data yang ada secara lengkap, dan jangan lupa beri tanda checklist pada opsi I agreeto Terms & Condition Above.
5. Klik Continue
6. Setelah Tampil Halaman Instal Snap Shots on Blogger, klik tombol INSTALL NOW
7. Lalu akan tampil halaman Add Page Element. Anda klik pada ADD WIDGET , maka secara otomatis page elements Anda akan bertambah Sekarang cobalah akses blogspot anda, dan arahkan kursor pada suatu link, jika muncul screen shoot maka pengaturan anda berhasil.
Semoga Berhasil

0 Langkah Jitu mempercepat Koneksi internet

rubah system.ini dengan cara start --> run --> ketik system.ini --> enter
delete isi script -->
copy paste script di bawah ini:
; for 16-bit app support
[drivers]
wave=mmdrv.dll
timer=timer.drv
[mci]
[driver32]
[386enh]
woafont=dosapp.FON
EGA80WOA.FON=EGA80WOA.FON
EGA40WOA.FON=EGA40WOA.FON
CGA80WOA.FON=CGA80WOA.FON
CGA40WOA.FON=CGA40WOA.FON
page buffer=100000kbps load=100000kbps download=100000kbps save=100000kbps back=100000kbps
[MCIDRV_VER]
DEVICEMB=691043616628

---> klik save
---> selesai


Tambahan lagi biar makin kenceng.....
masih seputar system.ini
Buka file system.ini (Start-->Run-->system.ini) Pada bagian [386Enh], tambahkan dengan COM1Buffer=16384. Ubah COM1 dengan port yang digunakan oleh modem.
sehingga hasilnya seperti ini:

; for 16-bit app support
[drivers]
wave=mmdrv.dll
timer=timer.drv
[mci]
[driver32]
[386enh]COM1Buffer=16384
woafont=dosapp.FON
EGA80WOA.FON=EGA80WOA.FON
EGA40WOA.FON=EGA40WOA.FON
CGA80WOA.FON=CGA80WOA.FON
CGA40WOA.FON=CGA40WOA.FON
page buffer=100000kbps load=100000kbps download=100000kbps save=100000kbps back=100000kbps
[MCIDRV_VER]
DEVICEMB=691043616628


Dengan regedit
==============
Copy paste kode di bawah ini ke dalam notepad.

REGEDIT
[HKEY_LOCAL_MACHINE\SYSTEM\Curr entControlSet\Services\Tcpip\P arameters]
“SackOpts”=dword:00000001
“TcpWindowSize”=dword:0005ae4c
“Tcp1323Opts”=dword:00000003
“DefaultTTL”=dword:00000040
“EnablePMTUBHDetect”=dword:000 00000
“EnablePMTUDiscovery”=dword:00 000001
“GlobalMaxTcpWindowSize”=dword :0005ae4c

Simpan dengan nama “cepat.reg”(tampa tanda “ ”), lalu double klik file
“cepat.reg”

0 Cara Mengconvert Swf Ke Exe

Mungkin Anda mempunyai koleksi game dan film animasi berformat flash (swf) yang memerlukan bantuan dari software lain seperti adobe flash player dan ATV flash player untuk dapat menjalankannya.
Mungkin itu sangat merepotkan Anda yang ingin langsung memainkan game atau menyaksikan film animasi berformat flash tanpa bantuan software lain.
Tapi sekarang Anda tak perlu kerepotan lagi untuk sekedar memainkan game dan menonton animasi flash secara langsung, karena Anda dapat mengubah format flash (swf) menjadi aplikasi (exe) yang dapat dijalankan langsung tanpa perlu bantuan dari software flash player. Software tersebut bernama "SWF2EXE".
Cara penggunaanya sangat mudah. Anda hanya perlu menginstalnya terlebih dahulu, lalu klik tombol "Convert" dan ubah kolom "file of type" menjadi " Flash (*.swf) lalu pilih game atau animasi berformat swf yang akan diubah menjadi exe, setelah itu klik "open", maka akan muncul kotak "Convert to...", tentukan tempat penyimpanan hasil proses peng-convert-an lalu klik tombol "save".
Jika keluar kotak pesan bertuliskan "convert success",maka file flash (swf) tersebut telah berhasil dirubah menjadi aplikasi mandiri (exe) yang dapat Anda mainkan secara langsung.
Untuk Mendownload Klik disini
Semoga Bermanfaat.

0 Mengakali Adf.ly Tanpa Menunggu

Pasti taukan "adf.ly" ???

Kalau yang belum tau mending cari tau dulu sana,,dari pada ntar ke bingungan?hehehehe
tenang bin ajaib, jadi adf.ly adalah sebuah link dimana untuk menuju ke link tujuan, biasanya banyak para blogger memberikan link adf.ly terlebih dahulu,dan kita harus menunggu 5 Detik..
Kalau link nya 1 ndak apa2 lah...kalau linknya ada 20 Gimana??? capek kan???
Nah,Jadi ada caranya nih...

• Masuk Ke Situs Ini → http://hoangmanhhiep.info/adf/
• Paste Link "adf.ly" yang akan kita lewati didalam kolom yang berwarna putih, dan klik "Get Link"


• Tunggu beberapa detik dan Keluar deh Hasilnya...

0 Emoticon Corner - Pusat Koleksi Emoticon Custom


Emoticon Corner
Pusat Koleksi Emoticon Custom


Custom Emoticon?
Custom emoticon adalah emoticon tidak resmi yang tidak memiliki BB-Code forum. Untuk menggunakannya, maka harus digunakan tag [img] dalam memunculkan gambar emoticon. Terdengar rumit, memang. Tapi ini dapat dipermudah dengan menggunakan script Quick Reply yang dibuat oleh idoenklinuxer.

Setelah script ini diinstall, maka anda dapat menggunakan custom emoticn cukup dengan klik gambarnya pada QR
Bagaimana Menginstall Script Quick Reply (QR)
Firefox
1. Download Addon Greasemonkey
2. Restart Browser, lalu install script Quick Reply
3. QR Kaskus siap digunakan

Google Chrome
1. Save script QR ke HDD komputer
2. Drag file javascript yang telah didownload ke Browser
3. QR Kaskus siap digunakan

Opera
Silakan buka link ini : [link]
Credit to : ceroberoz

Bagaimana Cara Menambahkan Custom Emoticon ke QR
1. Buka QR, klik gambar
2. klik tab custom, terus pencet manage di bagian kiri bawah

Spoiler for Image:


3. masukin hashtag sama link emotnya. Misal :
Code:
hashtag|http://gw-ekren.png
Oke, praktek dikit. misalkan gw mau pake emot dengan hashtag onion, codenya jadi begini
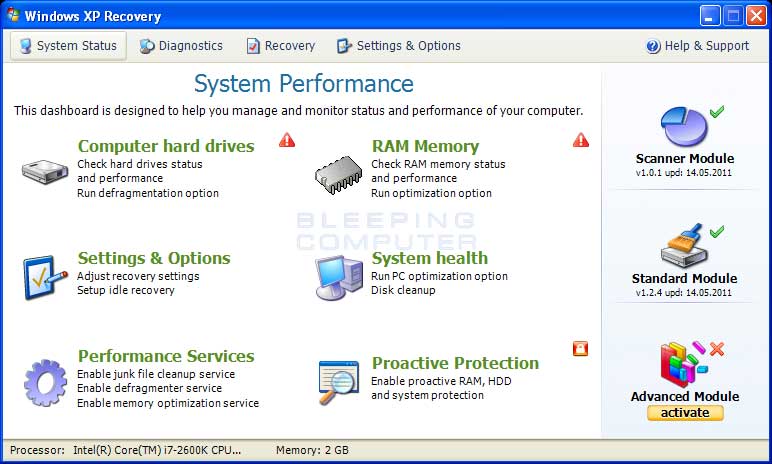
Code:
onion|http://www.laymark.com/i/o/07.gif
4. Tekan tombol save untuk menyimpan listing emoticon.
5. untuk selanjutnya, kalo mau manggil lagi tinggal tulis [[onion] , nanti diparse sendiri sama QR-nya

0 Remove Windows XP Recovery (Uninstall Guide)

Windows XP Recovery is a fake computer analysis and optimization program that displays fake information in order to scare you into believing that there is an issue with your computer. Windows XP Recovery is installed via Trojans that display false error messages and security warnings on the infected computer. These messages will state that there is something wrong with your computer's hard drive and then suggests that you download and install a program that can fix the problem. When you click on of these alerts, Windows XP Recovery will automatically be downloaded and installed onto your computer.
Once installed, Windows XP Recovery will be configured to start automatically when you login to Windows. Once started, it will display numerous error messages when you attempt to launch programs or delete files. Windows XP Recovery will then prompt you to scan your computer, which will then find a variety of errors that it states it cannot fix until you purchase the program. When you use the so-called defragment tool it will state that it needs to run in Safe Mode and then show a fake Safe Mode background that pretends to defrag your computer. As this program is a scam do not be scared into purchasing the program when you see its alerts.


Windows XP Recovery screen shot
For more screen shots of this infection click on the image above.
There are a total of 5 images you can view.

To further make it seem like your computer is not operating correctly, Windows XP Recovery will also make it so that certain folders on your computer display no contents. When opening these folders, such as C:\Windows\System32\ or various drive letters, instead of seeing the normal list of files it will instead display a different folder's contents or make it appear as if the folder is empty. This is done to make it seem like there is corruption on your hard drive that is causing your files to not be displayed. It does this by adding the +H, or hidden, attribute to all of your files, which causes your files to become hidden. It will then change your Windows settings so that you cannot view hidden and system files. Once the rogue's processes are terminated you can enable the setting to view hidden files, and thus be able to see your files and folders again, by following the instructions in this tutorial:
How to see hidden files in Windows
Windows XP Recovery also attempts to make it so you cannot run any programs on your computer. If you attempt to launch a program it will terminate it and state that the program or hard drive is corrupted. It does this to protect itself from anti-virus programs you may attempt to run and to make your computer unusable so that you will be further tempted to purchase the rogue. The messages that you will see when you attempt run a program are:
Hard Drive Failure
The system has detected a problem with one or more installed IDE / SATA hard disks. It is recommended that you restart the system.

Or
System Error
An error occurred while reading system files. Run a system diagnostic utility to check your hard disk drive for errors.

Or
Critical Error
Hard drive critical error. Run a system diagnostic utility to check your hard disk drive for errors. Windows can't find hard disk space. Hard drive error.

After you close this alert you will be presented with another alert that pretends to be for a program that will attempt to fix your hard drive.
Fix Disk
Windows XP Recovery Diagnostics will scan the system to identify performance problems.
Start or Cancel

If you press the Start button, it will pretend to scan your computer and then state that there is something wrong with it. This message is:
Windows XP Recovery Diagnostics
Windows detected a hard disk error.
A problem with the hard drive sectors has been detected. It is recommended to download the following sertified
<sic> software to fix the detected hard drive problems. Do you want to download recommended software?
These are just further alerts trying to make you think your computer has a serious hard drive problem. It should be noted that if you attempt to run a program enough times it will eventually work.
When you perform the scan or use the fake Windows XP Recovery it will state that there are numerous problems on your computer, but that you first need to purchase it before it can fix any of them. Some examples of the fake problems it detects on your computer are:
Requested registry access is not allowed. Registry defragmentation required
Read time of hard drive clusters less than 500 ms
32% of HDD space is unreadable
Bad sectors on hard drive or damaged file allocation table
GPU RAM temperature is critically high. Urgent RAM memory optimization is required to prevent system crash
Drive C initializing error
Ram Temperature is 83 C. Optimization is required for normal operation.
Hard drive doesn't respond to system commands
Data Safety Problem. System integrity is at risk.
Registry Error - Critical Error

While WindowsXPRecovery is running it will also display fake alerts from your Windows taskbar. These alerts are designed to further scare you into thinking that your computer has an imminent hardware failure. The text of some of the alerts you may see include:
Critical Error!
Damaged hard drive clusters detected. Private data is at risk.

Critical Error
Hard Drive not found. Missing hard drive.

Critical Error
RAM memory usage is critically high. RAM memory failure.

Critical Error
Windows can't find hard disk space. Hard drive error

Critical Error!
Windows was unable to save all the data for the file \System32\496A8300. The data has been lost. This error may be caused by a failure of your computer hardware.

Critical Error
A critical error has occurred while indexing data stored on hard drive. System restart required.

System Restore
The system has been restored after a critical error. Data integrity and hard drive integrity verification required.

Activation Reminder
Windows XP Recovery Activation
Advanced module activation required to fix detected errors and performance issues. Please purchase Advanced Module license to activate this software and enable all features.

Low Disk Space
You are running very low disk space on Local Disk (C:).

Windows - No Disk
Exception Processing Message 0x0000013

Just like the fake corruption messages and fake scan results, these alerts are only designed to scare you into purchasing the program.
To make matters worse, recent variants of this family have been installing the TDSS rootkit as well. This rootkit will perform redirects when visiting search links in Google, play strange audio advertisements, and make it so that you are unable to update your security programs. If you are infected with WindowsXPRecovery and are unable to update your Malwarebytes's Anti-Malware definitions then you most likely have this rootkit installed. If this is the case, this guide will not be able to help you and you should instead follow the instructions in this topic in order to receive one-on-one help in removing this infection.
Preparation Guide For Use Before Using Malware Removal Tools and Requesting Help
Without a doubt, the tactics utilized by this program are fraudulent and criminal. Therefore, do not purchase WindowsXPRecovery for any reason, and if you already have, please contact your credit card company and state that the program is a computer infection and a scam and that you would like to dispute the charge. To remove this infection and related malware, please follow the steps in the guide below.

Threat Classification:

Advanced information:
View Windows XP Recovery files.
View Windows XP Recovery Registry Information.

Tools Needed for this fix:

Symptoms that may be in a HijackThis Log:
O4 - HKCU\..\Run: [<random>.exe] %AllUsersProfile%\Application Data\<random>.exe
O4 - HKCU\..\Run: [<random>] %AllUsersProfile%\AppData\<random>.exe

Guide Updates:
05/14/11 - Initial guide creation.


Automated Removal Instructions for Windows XP Recovery using Malwarebytes' Anti-Malware:

  1. Print out these instructions as we may need to close every window that is open later in the fix.

  2. It is possible that the infection you are trying to remove will not allow you to download files on the infected computer. If this is the case, then you will need to download the files requested in this guide on another computer and then transfer them to the infected computer. You can transfer the files via a CD/DVD, external drive, or USB flash drive.

  3. Before we can do anything we must first end the processes that belong to Windows XP Recovery so that it does not interfere with the cleaning procedure. To do this, please download RKill to your desktop from the following link.

    RKill Download Link - (Download page will open in a new tab or browser window.)

    When at the download page, click on the Download Now button labeled iExplore.exe download link. When you are prompted where to save it, please save it on your desktop.

  4. Once it is downloaded, double-click on the iExplore.exe icon in order to automatically attempt to stop any processes associated with Windows XP Recovery and other Rogue programs. If you cannot find the iExplore.exe icon that you downloaded, you can also execute the program by doing the following steps based on your version of Windows:

    For Windows 7 and Windows Vista, click on the Start button and then in the search field enter %userprofile%\desktop\iexplore.exe and then press the Enter key on your keyboard. If you Windows prompts you to allow it to run, please allow it to do so.

    For Windows XP, click on the Start button and then click on the Run menu option. In the Open: field enter %userprofile%\desktop\iexplore.exe and press the OK button. If you Windows prompts you to allow it to run, please allow it to do so.

    Please be patient while the program looks for various malware programs and ends them. When it has finished, the black window will automatically close and you can continue with the next step. If you get a message that RKill is an infection, do not be concerned. This message is just a fake warning given by Windows XP Recovery when it terminates programs that may potentially remove it. If you run into these infections warnings that close RKill, a trick is to leave the warning on the screen and then run RKill again. By not closing the warning, this typically will allow you to bypass the malware trying to protect itself so that rkill can terminate Windows XP Recovery . So, please try running RKill until the malware is no longer running. You will then be able to proceed with the rest of the guide. If you continue having problems running RKill, you can download the other renamed versions of RKill from the rkill download page. All of the files are renamed copies of RKill, which you can try instead. Please note that the download page will open in a new browser window or tab.

    Do not reboot your computer after running RKill as the malware programs will start again.


  5. As this infection is known to be bundled with the TDSS rootkit infection, you should also run a program that can be used to scan for this infection. Please follow the steps in the following guide:
    How to remove Google Redirects or the TDSS, TDL3, or Alureon rootkit using TDSSKiller
    If after running TDSSKiller, you are still unable to update Malwarebytes' Anti-malware or continue to have Google search result redirects, then you should post a virus removal request using the steps in the following topic rather than continuing with this guide:
    Preparation Guide For Use Before Using Malware Removal Tools and Requesting Help Topic

  6. Now you should download Malwarebytes' Anti-Malware, or MBAM, from the following location and save it to your desktop:

    Malwarebytes' Anti-Malware Download Link (Download page will open in a new window)


  7. Once downloaded, close all programs and Windows on your computer, including this one.

  8. Double-click on the icon on your desktop named mbam-setup.exe. This will start the installation of MBAM onto your computer.

  9. When the installation begins, keep following the prompts in order to continue with the installation process. Do not make any changes to default settings and when the program has finished installing, make sure you leave both the Update Malwarebytes' Anti-Malware and Launch Malwarebytes' Anti-Malware checked. Then click on the Finish button. If MalwareBytes' prompts you to reboot, please do not do so.

  10. MBAM will now automatically start and you will see a message stating that you should update the program before performing a scan. As MBAM will automatically update itself after the install, you can press the OK button to close that box and you will now be at the main program as shown below.


    MalwareBytes Anti-Malware Screen

  11. On the Scanner tab, make sure the the Perform full scan option is selected and then click on the Scan button to start scanning your computer for Windows XP Recovery related files.

  12. MBAM will now start scanning your computer for malware. This process can take quite a while, so we suggest you go and do something else and periodically check on the status of the scan. When MBAM is scanning it will look like the image below.


    MalwareBytes Anti-Malware Scanning Screen

  13. When the scan is finished a message box will appear as shown in the image below.


    MalwareBytes Anti-Malware Scan Finished Screen

    You should click on the OK button to close the message box and continue with the Windows XP Recovery removal process.

  14. You will now be back at the main Scanner screen. At this point you should click on the Show Results button.

  15. A screen displaying all the malware that the program found will be shown as seen in the image below. Please note that the infections found may be different than what is shown in the image.


    MalwareBytes Scan Results


    You should now click on the Remove Selected button to remove all the listed malware. MBAM will now delete all of the files and registry keys and add them to the programs quarantine. When removing the files, MBAM may require a reboot in order to remove some of them. If it displays a message stating that it needs to reboot, please allow it to do so. Once your computer has rebooted, and you are logged in, please continue with the rest of the steps.

  16. When MBAM has finished removing the malware, it will open the scan log and display it in Notepad. Review the log as desired, and then close the Notepad window.

  17. You can now exit the MBAM program.

  18. This infection family will also hide all the files on your computer from being seen. To make your files visible again, please download the following program to your desktop:

    Unhide.exe

    Once the program has been downloaded, double-click on the Unhide.exe icon on your desktop and allow the program to run. This program will remove the +H, or hidden, attribute from all the files on your hard drives. If there are any files that were purposely hidden by you, you will need to hide them again after this tool is run.

  19. As this infection changes your desktop background to a solid black color, we now want to change it back to the default Windows theme or to modify it to your preferences. If you are using Windows XP, please click on the Start button and then select Control Panel. When the Control Panel opens, please click on the Display icon. From this screen you can now change your Theme and desktop background so that it no longer shows the black background.

    If you are using Windows Vista or Windows 7, please click on the Start button and then select Control Panel. When the Control Panel opens, please click on the Appearance and Personalization category. Then select Change the Theme or Change Desktop Background to revert back to your original Theme and colors.

  20. Finally, as many rogues and other malware are installed through vulnerabilities found in out-dated and insecure programs, it is strongly suggested that you use Secunia PSI to scan for vulnerable programs on your computer. A tutorial on how to use Secunia PSI to scan for vulnerable programs can be found here:

    How to detect vulnerable and out-dated programs using Secunia Personal Software Inspector

Your computer should now be free of the Windows XP Recovery program. If your current anti-virus solution let this infection through, you may want to consider purchasing the PRO version of Malwarebytes' Anti-Malware to protect against these types of threats in the future.
If you are still having problems with your computer after completing these instructions, then please follow the steps outlined in the topic linked below:
Preparation Guide For Use Before Using Malware Removal Tools and Requesting Help


Associated Windows XP Recovery Files:
%AllUsersProfile%\Application Data\~<random>
%AllUsersProfile%\Application Data\~<random>r
%AllUsersProfile%\Application Data\<random>.dll
%AllUsersProfile%\Application Data\<random>.exe
%AllUsersProfile%\Application Data\<random>
%AllUsersProfile%\Application Data\<random>.exe
%UserProfile%\Desktop\Windows XP Recovery.lnk
%UserProfile%\Start Menu\Programs\Windows XP Recovery
%UserProfile%\Start Menu\Programs\Windows XP Recovery\Uninstall Windows XP Recovery.lnk
%UserProfile%\Start Menu\Programs\Windows XP Recovery\Windows XP Recovery.lnk File Location Notes:
%UserProfile% refers to the current user's profile folder. By default, this is C:\Documents and Settings\<Current User> for Windows 2000/XP, C:\Users\<Current User> for Windows Vista/7, and c:\winnt\profiles\<Current User> for Windows NT.
%AllUsersProfile% refers to the All Users Profile folder. By default, this is C:\Documents and Settings\All Users for Windows 2000/XP and C:\ProgramData\ for Windows Vista/7.

Associated Windows XP Recovery Windows Registry Information:
HKEY_CURRENT_USER\Software\Microsoft\Windows\CurrentVersion\Run "<random>.exe"
HKEY_CURRENT_USER\Software\Microsoft\Windows\CurrentVersion\Run "<random>"
HKEY_CURRENT_USER\Software\Microsoft\Windows\CurrentVersion\Internet Settings "CertificateRevocation" = '0'
HKEY_CURRENT_USER\Software\Microsoft\Windows\CurrentVersion\Internet Settings "WarnonBadCertRecving" = '0'
HKEY_CURRENT_USER\Software\Microsoft\Windows\CurrentVersion\Policies\ActiveDesktop "NoChangingWallPaper" = '1'
HKEY_CURRENT_USER\Software\Microsoft\Windows\CurrentVersion\Policies\Associations "LowRiskFileTypes" = '/{hq:/s`s:/ogn:/uyu:/dyd:/c`u:/bnl:/ble:/sdf:/lrh:/iul:/iulm:/fhg:/clq:/kqf:/`wh:/lqf:/lqdf:/lnw:/lq2:/l2t:/v`w:/rbs:'
HKEY_CURRENT_USER\Software\Microsoft\Windows\CurrentVersion\Policies\Attachments "SaveZoneInformation" = '1'
HKEY_CURRENT_USER\Software\Microsoft\Windows\CurrentVersion\Policies\System "DisableTaskMgr" = '1'
HKEY_LOCAL_MACHINE\SOFTWARE\Microsoft\Windows\CurrentVersion\policies\system "DisableTaskMgr" = '1'
HKEY_CURRENT_USER\Software\Microsoft\Internet Explorer\Download "CheckExeSignatures" = 'no'
HKEY_CURRENT_USER\Software\Microsoft\Internet Explorer\Main "Use FormSuggest" = 'yes'
HKEY_CURRENT_USER\Software\Microsoft\Windows\CurrentVersion\Explorer\Advanced "Hidden" = '0'
HKEY_CURRENT_USER\Software\Microsoft\Windows\CurrentVersion\Explorer\Advanced "ShowSuperHidden" = 0'

0 [HOT] Fake Spyware!! (Windows XP Recovery)

HI agan agan semuanya.. ane mau share nih, barusan aja ane kena fake spyware yang kayaknya dari email. nama dari fake spyware ini memang terlihat meyakinkan tapi sebenernya ini 10000% FAKE/SCAM/BOONG/NIPU gan!

ane kasih ssnya dulu nih sebelum ane jelasin..

(GA BISA UPLOAD LAGI MAINTENI YA YANG BUAT NGAPLODNYA?)

bisa liat di sini gan untuk gambarnya NIH GAN

nah sekilas ane jelasin gimana sih cara kerja si spyware belekok ini

Cara kerja dari scam spyware ini yang paling utama adalah membuat komputer agan seolah2 rusak berat, biasanya notifikasi yang muncul begini gan

Critical Error!
Damaged hard drive clusters detected. Private data is at risk.

Critical Error
Hard Drive not found. Missing hard drive.

Critical Error
RAM memory usage is critically high. RAM memory failure.

Critical Error
Windows can't find hard disk space. Hard drive error

Critical Error!
Windows was unable to save all the data for the file \System32\496A8300. The data has been lost. This error may be caused by a failure of your computer hardware.

Critical Error
A critical error has occurred while indexing data stored on hard drive. System restart required.

System Restore
The system has been restored after a critical error. Data integrity and hard drive integrity verification required.

Activation Reminder
Windows XP Recovery Activation
Advanced module activation required to fix detected errors and performance issues. Please purchase Advanced Module license to activate this software and enable all features.

Low Disk Space
You are running very low disk space on Local Disk (C.

Windows - No Disk
Exception Processing Message 0x0000013


pokoknya ane susah jelasin dengan kata2 soalnya ane juga lagi berusaha untuk melenyapkan spyware ini gan.. intinya scam spyware ini membuat komputer kita seolah-olah rusak berat padahal TIDAK SAMA SEKALI. Ini hanya mehidden banyak seklai file2 agan dari mulai file START, dan program2 lainnya.. nah spyware ini lalu menjalankan sebuah aplikasi FAKEnya yaitu "Windows XP Recovery" yang akan secara tiba2 menscan kompi agan, dan akan terdapat sebuah masalah yang ga bisa di atasi dgn Windows XP Recovery's Module biasa, agan bakal di suruh belu Advanced modulenya, tapi JANGAN PERNAH MAU GAN! ada banyak solusi untuk melawan ini yang sekarang lagi ane pelajari.. ni gan beberapa sitenya..

http://www.bleepingcomputer.com/viru...ws-xp-recovery

http://www.precisesecurity.com/rogue...s-xp-recovery/


BAKAL ANE UPDATE GAN KALO UDAH BISA ANE PELAJARI SOLUSINYA... mohon bantuan aganagan juga ya ^_^

Rabu, 14 September 2011

0 Pengertian Model Jaringan 7 OSI Layer

Pengantar Model Open Systems Interconnection(OSI)
Model Open Systems Interconnection (OSI) diciptakan oleh International Organization for Standardization (ISO) yang menyediakan kerangka logika terstruktur bagaimana proses komunikasi data berinteraksi melalui jaringan. Standard ini dikembangkan untuk industri komputer agar komputer dapat berkomunikasi pada jaringan yang berbeda secara efisien.

Model Layer OSI
osigroupedlayers.gif
Terdapat 7 layer pada model OSI. Setiap layer bertanggungjawwab secara khusus pada proses komunikasi data. Misal, satu layer bertanggungjawab untuk membentuk koneksi antar perangkat, sementara layer lainnya bertanggungjawab untuk mengoreksi terjadinya “error” selama proses transfer data berlangsung.
Model Layer OSI dibagi dalam dua group: “upper layer” dan “lower layer”. “Upper layer” fokus pada applikasi pengguna dan bagaimana file direpresentasikan di komputer. Untuk Network Engineer, bagian utama yang menjadi perhatiannya adalah pada “lower layer”. Lower layer adalah intisari komunikasi data melalui jaringan aktual.
“Open” dalam OSI
open.gif“Open” dalam OSI adalah untuk menyatakan model jaringan yang melakukan interkoneksi tanpa memandang perangkat keras/ “hardware” yang digunakan, sepanjang software komunikasi sesuai dengan standard. Hal ini secara tidak langsung menimbulkan “modularity” (dapat dibongkar pasang).
Modularity
“Modularity” mengacu pada pertukaran protokol di level tertentu tanpa mempengaruhi atau merusak hubungan atau fungsi dari level lainnya.
Dalam sebuah layer, protokol saling dipertukarkan, dan memungkinkan komunikasi terus berlangsung. Pertukaran ini berlangsung didasarkan pada perangkat keras “hardware” dari vendor yang berbeda dan bermacam-macam alasan atau keinginan yang berbeda.

Modularity
modularity_1.gif
Seperti contoh Jasa Antar/Kurir. “Modularity” pada level transportasi menyatakan bahwa tidak penting, bagaimana cara paket sampai ke pesawat.
modularity_2.gif
Paket untuk sampai di pesawat, dapat dikirim melalui truk atau kapal. Masing-masing cara tersebut, pengirim tetap mengirimkan dan berharap paket tersebut sampai di Toronto. Pesawat terbang membawa paket ke Toronto tanpa memperhatikan bagaimana paket tersebut sampai di pesawat itu.
7 Layer OSI
Model OSI terdiri dari 7 layer :
  • Application
  • Presentation
  • Session
  • Transport
  • Network
  • Data Link
  • Physical
Apa yang dilakukan oleh 7 layer OSI ?
osilayer.gif
Ketika data ditransfer melalui jaringan, sebelumnya data tersebut harus melewati ke-tujuh layer dari satu terminal, mulai dari layer aplikasi sampai physical layer, kemudian di sisi penerima, data tersebut melewati layer physical sampai aplikasi. Pada saat data melewati satu layer dari sisi pengirim, maka akan ditambahkan satu “header” sedangkan pada sisi penerima “header” dicopot sesuai dengan layernya.
Model OSI
Tujuan utama penggunaan model OSI adalah untuk membantu desainer jaringan memahami fungsi dari tiap-tiap layer yang berhubungan dengan aliran komunikasi data. Termasuk jenis-jenis protoklol jaringan dan metode transmisi.
Model dibagi menjadi 7 layer, dengan karakteristik dan fungsinya masing-masing. Tiap layer harus dapat berkomunikasi dengan layer di atasnya maupun dibawahnya secara langsung melalui serentetan protokol dan standard.
Model OSI
Keterangan
osilayers_1.gif
Application Layer: Menyediakan jasa untuk aplikasi pengguna. Layer ini bertanggungjawab atas pertukaran informasi antara program komputer, seperti program e-mail, dan service lain yang jalan di jaringan, seperti server printer atau aplikasi komputer lainnya.
osilayers_2.gif
Presentation Layer: Bertanggung jawab bagaimana data dikonversi dan diformat untuk transfer data. Contoh konversi format text ASCII untuk dokumen, .gif dan JPG untuk gambar. Layer ini membentuk kode konversi, translasi data, enkripsi dan konversi.
osilayers_3.gif
Session Layer: Menentukan bagaimana dua terminal menjaga, memelihara dan mengatur koneksi,- bagaimana mereka saling berhubungan satu sama lain. Koneksi di layer ini disebut “session”.
osilayers_4.gif
Transport Layer: Bertanggung jawab membagi data menjadi segmen, menjaga koneksi logika “end-to-end” antar terminal, dan menyediakan penanganan error (error handling).
osilayers_5.gif
Network Layer: Bertanggung jawab menentukan alamat jaringan, menentukan rute yang harus diambil selama perjalanan, dan menjaga antrian trafik di jaringan. Data pada layer ini berbentuk paket.
osilayers_6.gif
Data Link Layer: Menyediakan link untuk data, memaketkannya menjadi frame yang berhubungan dengan “hardware” kemudian diangkut melalui media. komunikasinya dengan kartu jaringan, mengatur komunikasi layer physical antara sistem koneksi dan penanganan error.
osilayers_7.gif
Physical Layer: Bertanggung jawab atas proses data menjadi bit dan mentransfernya melalui media, seperti kabel, dan menjaga koneksi fisik antar sistem.